Thanks for reading this post and Brass Ring also thanks those whose content is shared here on our website. We present it in order to pass on their knowledge to our small business clients so it can help them remain informed, healthy and growing their businesses. Please bookmark our site, subscribe to our newsletter and come back for more marketing, small business & WordPress tips, advice, tools & news! - Edward A. Sanchez
Chances are that if you’re using WordPress then most of your time within the admin is in the WordPress post/page editor. It is, after all, where all of the content for your site is created. And yet, there are not a lot of blog posts out there helping users get the most out of this all-important admin area. “What you see is what you get” may be the term for how the editor functions, but that doesn’t need to be our attitude towards the editor itself. In fact, as I hope to show in today’s post, if you take some time to explore the WordPress editor more closely and/or extend it with a few useful plugins, it may reveal a lot more functionality than what you initially thought you had at your disposal.
If you prefer, you can read this article HERE on Elegant Themes Blog
5 Tips for Using the Default WordPress Post Editor to the Fullest
The WordPress visual/text editor for posts and pages can be found when you go toAdmin > Posts > Add New or Admin > Pages > Add New. In either case you will be brought to what should be, for anyone who has used WordPress before, a familiar screen. However, like many, you may not know all of its ins-and-outs and how best to use them. The tips below are designed to remedy that.
1. Take Advantage of the Screen Options
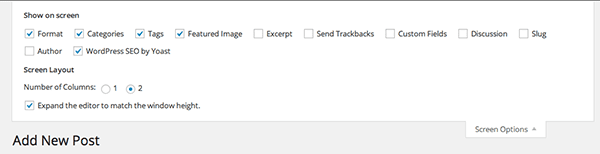
The WordPress Editor page is made up almost entirely of what are called metaboxes. Aside from the main content box, metaboxes like Publish, Format, Categories, Tags, Featured Image, and more can really clutter up your screen. Wouldn’t it be nice if you could make any box you find unnecessary just go away? Well, actually, you can!
All you have to do is navigate to the top right hand corner of the screen to the Screen Options drop-down. When you click on it you will notice a check box for every metabox. If you don’t want to see a particular metabox each time you visit the post or page editor, simply uncheck that box and it will disappear. It’s not gone, you can always bring it back with a single click, but you just don’t have to look at it by default anymore.
You can also drag and drop the remaining metaboxes into the order you’d like them in by clicking the top area of the metabox with your mouse and dragging it to the desired location.
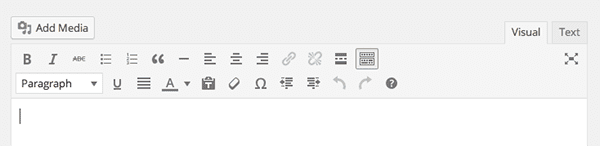
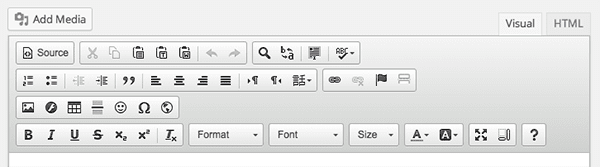
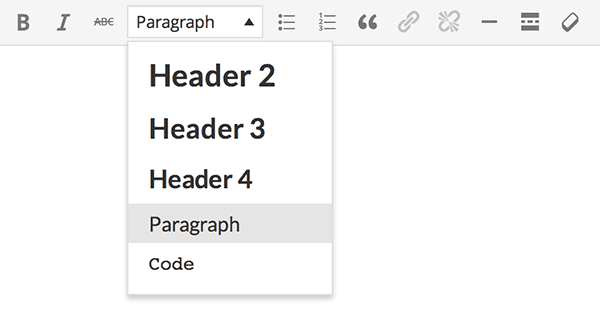
2. Open Up the Kitchen Sink
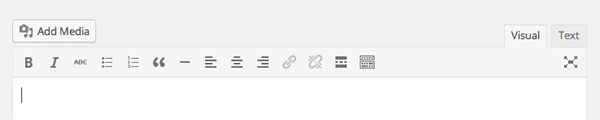
Now that we have the editor screen organized the way we like it, we can get to exploring the editor itself. Above you will see what the editor looks like by default. If you’ve never taken the time to expand these controls (or if you always create content in the text tab) then you may not have taken full advantage of what is commonly called “the kitchen sink” as in “the default mode provides you with everything but the kitchen sink; but if you want that too, we’ve got you covered.” To gain access to “the kitchen sink” simply click the last icon on the far right, called the toolbar toggle, and you will see an expanded set of controls as in the image below.
With these controls you are now able to switch easily between paragraph and headers 1-6, you get a text underline option, justify, text color, and more. Among the most useful of this expanded tool set is the “paste as plain text tool” represented by the clipboard icon. This assures that the text you may be pasting from another source does not retain the formatting and styles of that source but rather conforms to the format and style of your website instead.
3. Learn the Keyboard Shortcuts
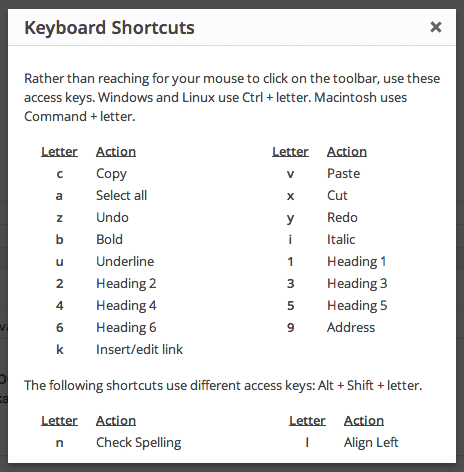
Notice the question mark icon on the far right of the second row of controls? It’s actually not a control but a repository of keyboard shortcuts for all kinds of useful actions within the editor. Learn these and you may just blaze through every editor related task at speeds you never thought possible.
4. Use Distraction Free Writing Mode
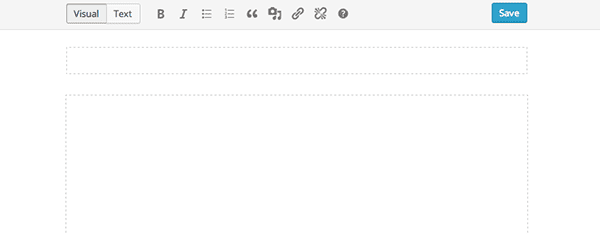
Perhaps all of these controls, metaboxes, and admin options in general are overwhelming. Perhaps you find them distracting and what you really need is a simplified space for nothing but writing. If so, you’re not alone. Apparently enough people have had those same thoughts that WordPress comes standard with a distraction free writing screen. To access it all you have to do is click the full-screen button below the visual/text tabs.
If you can combine this screen (as pictured above) with the keyboard shortcuts we just learned how to access, you can really be productive in the distraction free mode.
5. Don’t Be Afraid of the Text Editor Tab

Finally, we come to the text editor tab. For many who are not comfortable with HTML or CSS, the text screen can feel like a step backwards in terms of usability or at worst an intimidating space for creativity. However, if you are able to use a bare handful of HMTL tags then the text editor screen can be the perfect solution for resolving tricky formatting issues or adding stylistic flair not provided by the visual editor controls–such as line height, font size, padding, etc.
Extend the WordPress Editor’s Capabilities with These 8 Useful Plugins
As you can see from the tips above, there’s actually quite a lot to the default WordPress editor. I didn’t go over every single control in detail, mostly because that would be excessive for the majority of you, as you’re all familiar with it in a general way already. I was concerned with the bits that are tucked in there, out of default mode, but still worth getting familiar with. But what if that’s not enough? What if you’d like to have more control, more options, more flexibility? That’s where plugins come in. Below I’ve gathered together eight free plugins from the official WordPress Directory that help extend the capabilities of the default WordPress post/page editor.
1. TinyMCE Advanced
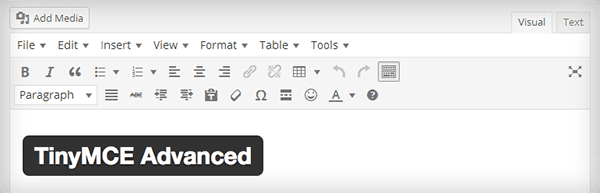
The default WordPress editor, which we’ve just explored above, uses a modified version of TinyMCE; an open source software just like WordPress. TinyMCE Advanced is simply a more robust version of TinyMCE that adds some impressive functionality. Such as: support for creating and editing tables, more options when inserting lists, search and replace, font family and font size, and much more.
Download TinyMCE Advanced Plugin
2. WP Edit
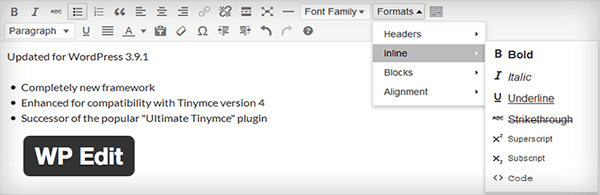
WP Edit is intended to unlock the power of the text editor without the need to know any HTML or CSS. It adds a lot of additional features to those we went over above. They include: easily insertable shortcodes (for columns and other formats), tables and table editing capabilities, font family, font size, and a whole series of other formats and features. It is also a variation of the TinyMCE software.
3. WP Super Edit
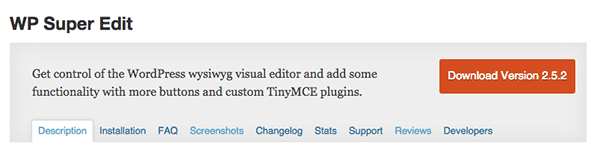
Similarly, WP Super Edit (different plugin author) also aims to enhance TinyMCE with even more options–as you can see in the image below.

If this feels like overkill, or perhaps you like some (but not all) of these new controls, you’re able to adjust–via a drag and drop settings panel–which new buttons you’d like to display.
4. CKEditor for WordPress
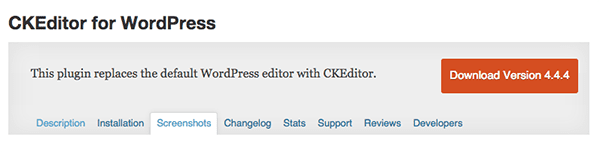
And finally we come to the last of the four “replacement” editors: CKEditor for WordPress. Unlike those above, this does not add to or extend TinyMCE but rather swaps in a whole new open source WYSIWYG (what you see is what you get) editor from GitHub.
As you can see from the image above, the capabilities are approximately the same as the other advanced or extended versions of TinyMCE. Some perhaps unique features are its integrations with WP-Polls, GD Star Rating, and NextGEN Gallery.
Download CKEditor for WordPress Plugin
5. Visual Editor Font Size
Ever been writing up a post or some copy for a page and feel like you have to squint or lean in close to your screen to read the text? Of course it’s possible you need glasses, but chances are it’s just that the text in the editor is too small for you preference. Wouldn’t it be nice if you could increase or decrease the font size, just in the editor, to fit your needs? You’re in luck! That’s exactly what this plugin does.
Download Visual Editor Font Size Plugin
6. HTML Editor Syntax Highlighter
Text editor enthusiasts will love this plugin. It’s a simple syntax highlighter (as you can see in the image above) that makes scanning through or editing a post in the text editor much more enjoyable.
Download HTML Editor Syntax Highlighter Plugin
7. Visual Editor Custom Buttons
All of that extending and swapping still not providing enough functionality for you? How about adding your own, custom functions/buttons to the WordPress editor? That’s exactly what this plugin makes possible. Granted, it will require that you have the ability to create the function in the first place; but once done, you’re able to assign that particular HTML and/or CSS to a button where you can apply it with a single click from the visual editor.
Download Visual Editor Custom Buttons Plugin
8. Client-Proof Visual Editor
What happens when all this adding and extending provides the wrong person with too much control over the content you’ve worked so hard to get just the way you like it? Far too often, disaster. Or at least various degrees of annoyance. That’s where this plugin comes in. Instead of providing more options, this plugin provides less.
As you can see in the image above, it strips the editor controls down quite a bit. But if needed, you can go even further, making the editor truly “option-less”.
Download Client Proof Visual Editor Plugin
Bonus: Extend the WordPress Editor to Widgets!
Now that we’ve thoroughly explore the possibilities of the WordPress editor don’t you wish you had more places within WordPress to use it? Well, thanks to these two plugins, you do! You can now use the WordPress editor in widgets as opposed to the plain text editor that comes standard, opening up a whole new range of possibilities for sidebars and other widgetized text areas.
Black Studio TinyMCE Widget Plugin
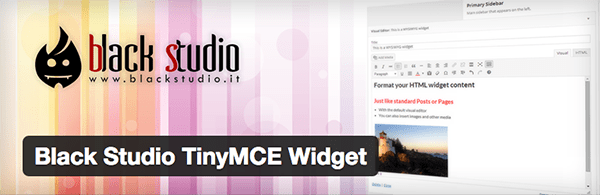
Download Black Studio TinyMCE Widget Plugin
WYSIWYG Widgets / Widget Blocks Plugin
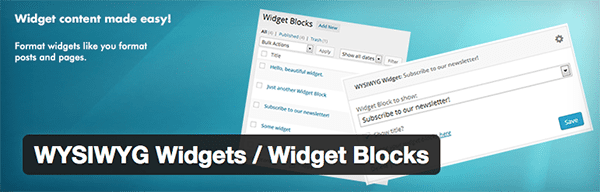
Download WYSIWYG Widgets / Widget Blogs Plugin
In Conclusion
While we may not consider it that ofter, the WordPress editor is arguably the heart of the WordPress admin. It may not house all of our most important settings, but its certainly where “all the magic happens” in terms of content creation. Knowing how to take full advantage of all its features just makes sense. And knowing its limitations gives us queues for the types of plugins we may need in order to supplement the functionality we desire.
I hope today’s post proved helpful in exploring what’s possible with the WordPress editor and a mere handful of the free plugins built to extend it. If you have any questions or comments about this post or the tools featured, please drop us a line in the comments below.
Thumbnail Image via shutterstock.com / Jane Kelly


Leave a Reply
You must be logged in to post a comment.